There’s a hidden sharing option in Windows 10 which many users don’t know about. Here in this guide we’re going to share the best way to enable sharing settings in Windows 10 to make sharing files and other items fast, fun and less cumbersome. These hidden sharing settings in Windows 10 allow you to configure sharing options the way you find easy to use.
Before moving forward, we would like to bring this into your notice that there are many other hidden options and features in Windows 10 that most users probably don’t know about, or Microsoft decided to hide them from users for security and stability reasons. But one of those hidden features in Windows 10 is the Sharing Settings to enable and configure sharing options on PC Windows 10 that shouldn’t have been hidden in the first place since its a great useful feature.
Hidden Sharing Options in Windows 10
Often times Windows users are required to resort to some sort of workaround to enable some interesting features that Microsoft thinks should be hidden or not easily accessible to normal users as they may impact system performance if not used properly. In Windows 10, there’s this great new feature that enables users to configure sharing settings in Windows 10.
Whatever the Microsoft’s reasons behind keeping sharing settings and options hidden, you can manually enable hidden sharing options in Windows 10. In a step-by-step guide below, see how to enable hidden sharing option in settings through the Windows 10 registry.
Note: The method below involves tweaking Windows 10 system registry, so be careful in following the steps as any misstep can cause errors.
1 – Press Windows Key + R to open the RUN dialogue box in Windows 10.
2 – In the RUN dialogue box, type regedit and hit OK to open Registry Editor in Windows 10.
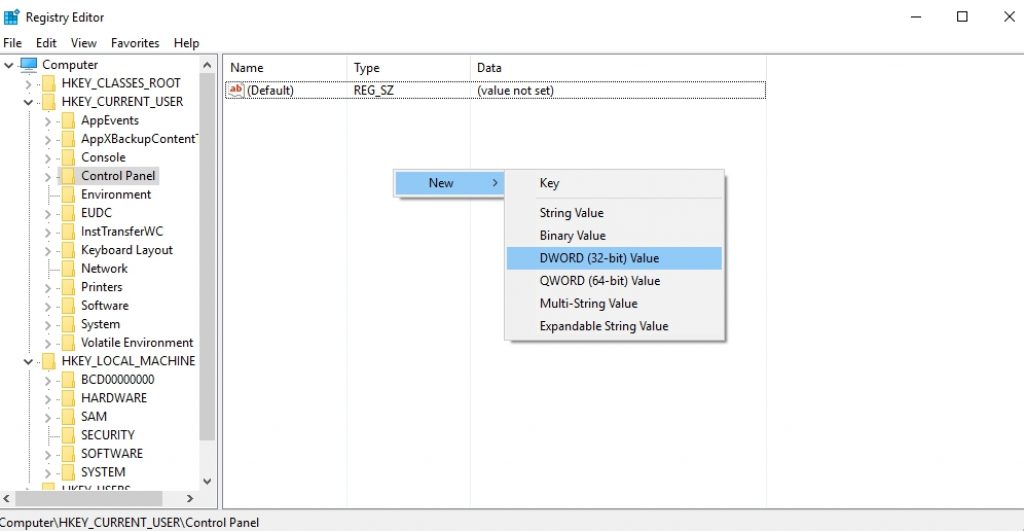
3 – In the Registry Editor Window, navigate to HKEY_CURRENT_USER\Control Panel. Right-click on an empty space in the right-pane of Registry Editor window and select New > DWORD (32-bit) Value from the drop-down box.
4 – You can give new DWORD any name, but for easy reference let’s name it ShareSettings and hit the enter key.
5 – Double-click on the newly created ‘ShareSettings’ DWORD (32-bit) Value and change the ‘Value Data’ from 0 to 1 and hit OK button.
6 – Close the Registry Editor and restart PC.
7 – After restart, Verify whether the changes made in the Registry Editor worked. For that, go to the Windows 10 Settings app, click on System option. Scroll down where you should see the Share option in the left-pane of the System settings window interface.
8 – Click on the Share option, now you’ll see on the right-pane of Sharing Options a list of apps that you can use to share content along with additional settings which were not available previously. You can also choose to enable or disable sharing options manually for various apps shown on the list.
9 – All done.
Now to check if the process has been successful, go to Edge browser, File Explorer, Windows Store or any other system service, and hit the Share button to see if the changes in Sharing options are being reflected as intended. Using the method above you can choose to manually enable/disable sharing options in Cortana, Edge Browser, Windows Store, OneDrive and other apps.
If you’re facing issues, send in comments below for further assistance.
Also See on AppsforWin10:
How To Fix DNS Server Not Responding Error
Import iCloud and Gmail Contacts to Windows 10 People App
How To Access and View Apple Photos in Windows 10
Download Microsoft Paint Preview for Windows 10 – [3D Painting App]
Download BlueStacks + Facebook Live for PC


