If your Windows 10 PC, laptop or Surface Pro device is running low on available storage space, here is a solution that you can apply to quickly free up space using Storage Sense utility. We have already shared a method about how to free up space by removing temporary files using Storage sense. In this post, you’ll learn a quick way to free up space automatically using Storage Sense on Windows 10 devices. If removing temporary files for recovering space is not what you are interested in, then follow the instructions below to perform automatic storage cleanup via Windows 10 Storage sense.
Microsoft introduced Storage sense in its latest desktop/laptop/tablet operating system in order to enable users to free up space on devices running low on available storage. Its functionality is not dissimilar to Disk Cleanup utility many Windows users are already familiar with in previous versions of the operating system. Like Disk Cleanup, this tool removes junk files taking up space on your computer. The type of files include, temporary files, unnecessary files, and recycle bin items. Storage sense is easier to use than the older Disk Cleanup. If you are not sure how much actual space is consumed by various files on your system, check out these best disk space analyzer tools for Windows 10 to get accurate, detailed snapshot of storage space on desktop and laptop.
If your PC disk shows 100% usage level most of the time, see this solution to Fix 100% Disk Usage on Windows 10, 7, 8, 8.1 devices.
Storage sense works to help you recover disk space. One way of getting space back is to delete previous version of Windows 10 after upgrading to the latest version. However, there is a quick method to get the lost storage space back if you configure Storage sense to automatically remove unwanted files.
Now, let’s see how you can quickly free up space on a hard drive by deleting junk files using the Windows 10 Settings app.
How To Recover Space Automatically Using Storage Sense on Windows 10
Windows 10 can automatically remove junk files and folders when your device starts running low on available disk storage space. Follow the steps below to free up disk space automatically on Windows 10.
1 – On your Windows 10 device, go to Settings.
2 – Click on System.
3 – Click on Storage.
4 – Click the Change how we free up space link.
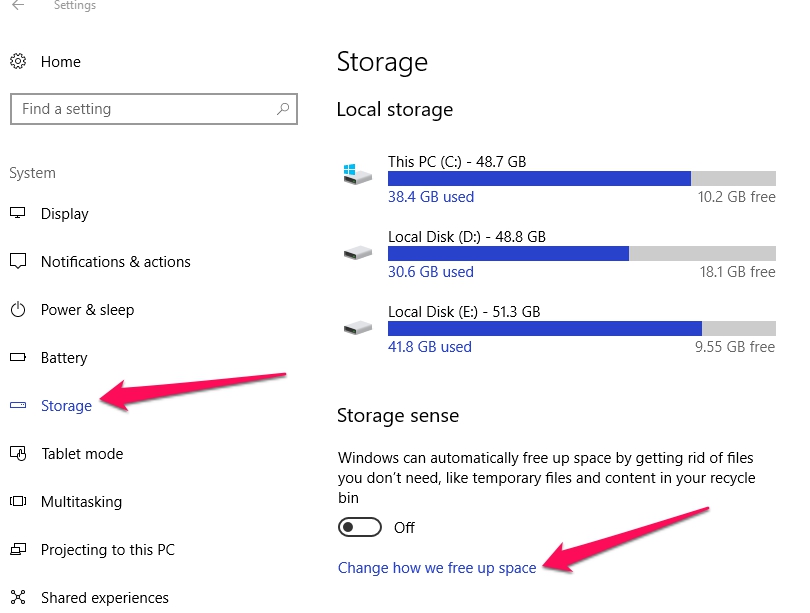
5 – On the next screen, turn on the Storage sense toggle switch.
6 – Next, click on the drop-down box and select when you want to run Storage sense automatically when your device is running low on space.
7 – Now under “Temporary files,” check the Delete temporary files that my apps aren’t using option.
8 – If you like, use the “Delete files in my recycle bin if they have been there for over” a certain number of days by clicking on the drop-down menu and select 1, 14, 30, 60 days, or never to disable the option.
9 – Similarly, you can delete files in the Download folder from the “Delete files in my Downloads folder if they have been there for over” drop-down menu and select 1, 14, 30, 60 days, or never to disable the option.
10 – All done.
Once your desired settings are set, you can go back to using your Windows 10 device without worrying about running low on space because the process of removing junk will be handed automatically by the operating system itself rather than manually cleaning up the temporary files. However, there is the Clean now button to run Storage sense whenever you like.
Note that the Storage sense is available on Windows 10 but it has limited option as of now. It won’t be until the Windows 10 Redstone 4 update comes out that you will be able to use more settings options for automatic disk cleanup.