Windows 10 Drivers Guide: Here is your complete detailed tutorial of how to install, update, uninstall and roll back drivers to previous version on PC and laptops. Windows Drivers are essential component of the computer OS without which the entire PC become pretty much useless. You cannot perform even basic tasks if the related drivers are not functioning properly on Windows 10 PC. After upgrading to new OS like Windows 10 or any other Windows version for that matter, changes are that some drivers stop working due hardware and software incompatibility, this issue arises especially when you install new OS on older PC/laptops. Installing drivers can sometimes become a hassle, so it’s always wise to have a guide at hand using which you can install, update, uninstall or roll back Windows 10 drivers easily on your computers without seeking any help from experts.
Most new hardware tools come with their drivers pre-installed, all you are required to so is to connect the hardware and its driver software setup starts automatically. However, some drivers like touchpad, WiFi, Bluetooth or similar others could become obselete on older PCs if you upgrade them to newer OS version. Which is why knowing how to install, update and uninstall Windows 10 PC drivers becomes vital.
Why Update Drivers?
PC drivers act as intermediary between hardware and software on PC Windows 10 to enable them to communicate and execute tasks. When i upgraded to Windows 10 from Windows 7 Touchpad driver on my PC stopped working, i downloaded latest version from official manufacturer website and installed it multiple times but to no avail it still didn’t work reason being most Manufacturers stop releasing driver updates for older PCs to work on new OS. In an attempt to save cost they shift all resources to making drivers for new PC version running on latest OS.
BUT, there is a fix to everything including driver problems on Windows 10. Here i am going to show in a simple guide how you can fix Windows 10 Driver issues on any PC or laptop no matter how old or new it is.
Update Drivers to Stop Blue Screen of Death Drivers:
Keeping Windows 10 Drivers updated is essential to avoid unexpected PC crashes caused by sordid BSOD Blue Screen of Death Errors on PC. In such situations you can resort to a few tricks; either roll back to previous working version of the driver, or update the existing faulty driver from PC Device Manager. If that doesn’t work then try uninstalling and reinstalling the driver to see if it works.
Here’s how you can install, update, uninstall or roll back Windows drivers.
Update Windows 10 Drivers
Windows 10 automatically installs latest drivers software for all hardware devices attacked to your PC when you upgrade to new OS. But if the driver is outdated then it may not get updated during the Windows upgrades process. To fix outdated Windows 10 drivers try to update them using following instructions:
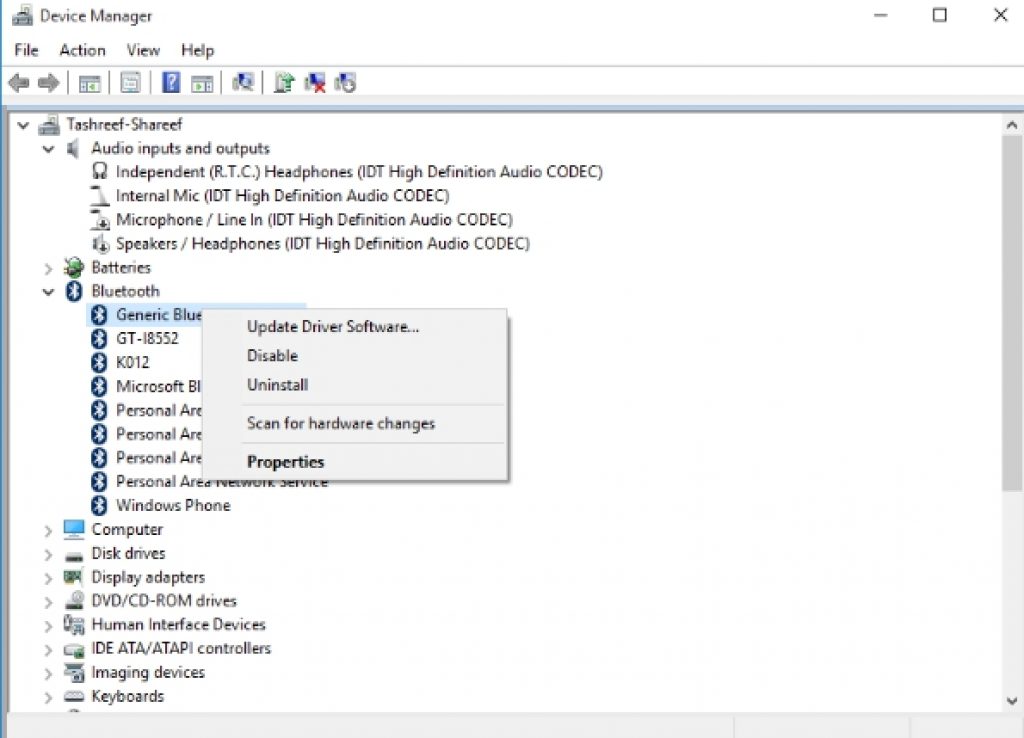
- Open Device Manager from Cortana voice command or type it in the search box or right-click This PC then select Properties and click Device Manager option.
- On Device Manager window right-click on the outdated driver and select Properties from the context menu.
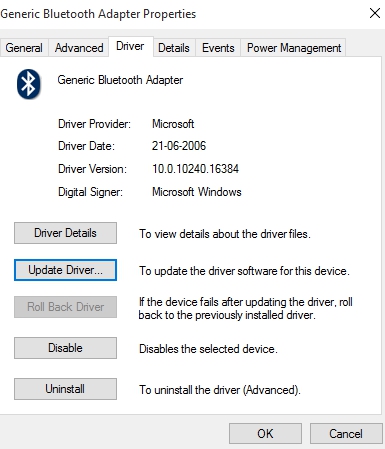
- Under Properties window, click Driver tab and then Update Driver option.
A new Dialogue box window will open asking you to select driver update option. If you have driver software saved on PC then upload it manually from there otherwise select ‘Search automatically for updated driver software’ option. Update the driver and restart the PC to apply changes.
Roll Back Windows 10 Drivers to a Previous (Working) Version
From time to time developers issue updates of their drivers for Windows PC. Mostly they improve performance and stability but sometimes they can also make things worse than before especially on older PCs with outdated hardware drivers. This may cause system crashes and hardware could stop working properly. In such a situation, it’s better to roll back to the previous stable version of the driver until a new fixed version is released. Here’s how to do it:
- Open ‘Device Manager’, for that, right-click This PC, select Properties and click Device Manager. Or simply type Device Manager in the search box and click on the icon to open it.
- In Device Manager window, select the faulty driver and right-click on it and choose Properties.
- In Properties window, select ‘Driver’ tab and click on the Roll Back Driver option from the list to go back to the previous version which was working fine on your PC.
- Click OK button and restart the PC.
If the Roll Back Driver button is grayed out, it means that you didn’t backup previous version. So find that version on the internet.
Uninstall Windows 10 Drivers
If updating and rolling back to the previous driver version didn’t work on PC then its time to uninstall and reinstall the driver software again. There are two ways to uninstall drivers on Window 10:
Drivers such as Graphics drivers, Intel Display Drivers, Sound Card Drivers can be uninstalled from the Control Panel. Such drivers have their own software with driver tools and to uninstall driver you may need to uninstall software package as well from Control Panel. Open Control Panel, go to Program then Programs and Features and uninstall software tool.
Or you can uninstall drivers from Device Manager:
- Open Device Manager and right-click on the driver and then select Properties.
- In Properties window, click Driver tab and then select Uninstall Driver option.
- Now hit the OK button.
Next, to reinstall the driver plug hardware and wait for Windows to automatically pick up driver software to install. Otherwise, go to manufacturer website to download latest version and install it on PC.
After downloading the driver software from manufacturer website and trying to install it manually, if you see Publisher has been Blocked error then see this guide to fix this publisher has been blocked from running software on this machine.
Also Check Out on AppsforWin10: How to Install and Run iOS Apps on Windows 10 | Top 10 Best Windows 10 Themes – [Download Free]


