In this tutorial, we are going to show you how to easily fix Windows 10 upgrade error 0x80070070 on desktop PC, laptop or tablet. If you get this error 0x80070070 while upgrading your device to a new version of Windows 10, then the following guide will be of great help to you.
Sometimes upgrading to a new version of Windows 10, such as Fall Creators Update, Creators Update or any other feature update, could cause your device to experience an unexpected error that doesn’t allow the process to complete. Common error codes include 0x80070070 – 0x50011, – 0x50012, or – 0x60000 when using Media Creation tool, the Update assistant, or the Windows Update feature.
The Windows 10 upgrade error 0x80070070 could surface in any of its three forms. Fortunately, they are not serious issues. If you get any of these messages (0x80070070 – 0x50011, 0x80070070 – 0x50012, 0x80070070 – 0x60000) it simply means that your computer doesn’t have enough free space to successfully finish the upgrade process.
In the guide below, you’ll learn steps to fix error 0x80070070 as you try to upgrade Windows 10 to the Fall Creators Update or another feature update.
Methods To Fix Error 0x80070070 on Windows 10
When you get Windows 10 error 0x80070070 – 0x50011, 0x80070070 – 0x50012, 0x80070070 – 0x60000, all that is required is to free up storage space of your main system drive. If it is not possible, you can use the use external hard drive, or USB drive with enough free space to Windows 10 can use as temporary storage.
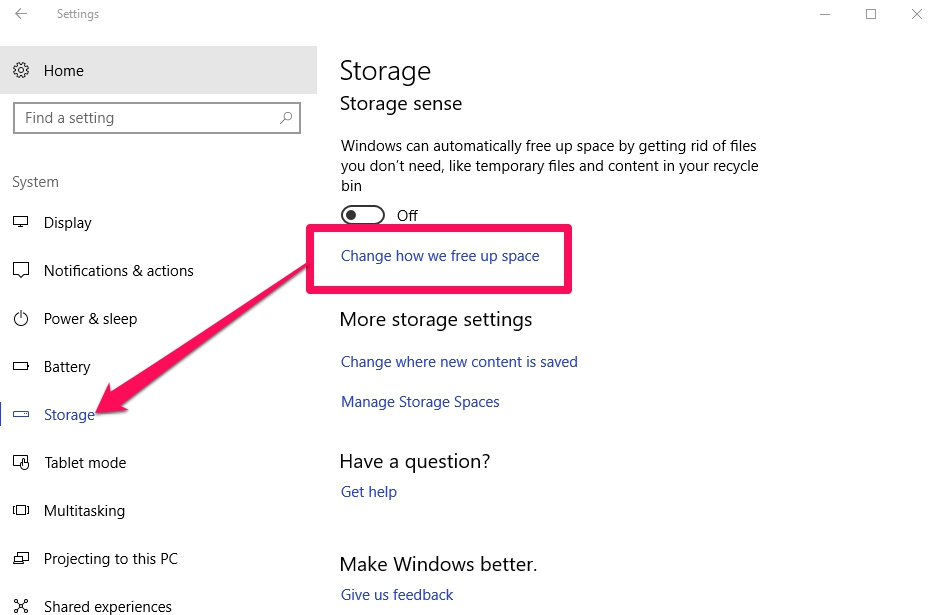
1 – Clear Space using Settings: Normally it is recommended that your device should have around 15GB of free space to install a big Windows 10 feature update. If your device lacks enough space, you can recover it by deleting files or move them to an external hard drive or USB storage. Here is how to free up space using Storage Sense in the Settings app:
1 – Open Settings.
2 – Go to System > Storage.
3 – Under ‘Storage sense,’ click the Change how we free up space link.
4 – Turn the toggle switch on for: Delete temporary files that my apps aren’t using and Delete files that have been in the recycle bin for over 30 days.
5 – Hit the Clean now button.
6 – All done. This should give you some extra free space to download a new update.
Or check out the following trick to recover storage space on Windows 10 device.
2 – Delete Temporary System Files Using Windows 10 Settings App: If this doesn’t work, then try the steps below to delete temporary system files using the Settings app.
1 – Open Settings.
2 – Go to System > Storage.
3 – Click the primary drive, usually is the This PC (C:) drive.
4 – Click on Temporary files on the next window.
5 – Select the files you want to delete. Temporary files includes temporary files from apps, files in the Download folder, recycle bin, and previous installation files.
6 – Once selected, click the Remove files to complete the task.
Or you can use Disk Cleanup utility to recover storage space from your device.
3 – Clear Storage using Windows 10 Disk Cleanup: Here are the steps you can use to clear storage using the Disk Cleanup.
1 – Open File Explorer. Download new File Explorer for Windows 10.
2 – Click on This PC.
3 – Right-click the drive with the Windows 10 installation and select Properties.
4 – Click on Disk Cleanup button.
5 – Then, click the Cleanup system files buttno.
6 – Check the items you want to delete. Remember do NOT select Temporary Windows Installation Files on the list as these are the files that are needed to upgrade your system.
7 – Hit OK and then click Delete Files to finish the process.
All done. You have completed the required steps to clear temporary files on Windows 10 to recover lost storage space. Moreover, you can also get a new touch-enabled file explorer starting from the Creators Update: How To Enable Hidden Touch File Explorer In Windows 10 Creators Update. For more help, leave questions in the comments box below.


