Windows Memory Dump is the dump file that is created every time there appears a blue screen error on Windows PC/laptop. When you see a message on blue windows screen saying ‘collecting error information’ it means that BSOD error has occurred and Windows automatically creates dump files that contains the copy of computer’s memory at the time of crash to help identify the problem that led to the crash and find its diagnosis to fix the error. If you know how to create Windows memory dump whenever a blue screen error happens, it gets easy to find drivers or program causing the error. Here you can learn in simple steps how to create small memory dump file on Windows 10/8/8.1/7/XP to store, read and send them to Microsoft for diagnostic.
Windows Memory Dump
When Windows PC crashes the operating system stores the crash information on a single file which is referred as Dump File. In this memory dump file all details about the error are saved so that an expert can look into it and help your fix the problem on your PC. Dump files are of three different types:
1 – Kernel Memory Dump
Kernel Memory Dump consists of following as per Microsoft:
“A Kernel Memory Dump contains all the memory in use by the kernel at the time of the crash.
This kind of dump file is significantly smaller than the complete memory dump. Typically, the dump file will be around one-third the size of the physical memory on the system. Of course, this quantity will vary considerably, depending on your circumstances.
This dump file will not include unallocated memory, or any memory allocated to user-made applications. It only includes memory allocated to the Windows Kernel and hardware abstraction level, as well as memory allocated to kernel-mode drivers and other kernel-mode programs.”
2 – Small Memory Dump
This dump file is the smallest in size, it could be 256KB or 128 KB in size and has kernel information, process information and loaded drivers list among many other items. This small file is really helpful in determining what caused blue screen error on PC. Best thing about it is the ease of understanding, you don’t have to be an expert to understand the content of this file to identify the problem.
3 – Full Memory Dump File
This is the largest dump file in terms of size because it saves all PC data before the crash. This file is for experts to analyze problem on the system.
Now, lets move on to find out how to create small memory dump on Windows that even non-experts can understand and use its information to fix problem causing blue screen errors.
How to Create Small Memory Dump file on Windows PC:
Here’s how to create small dump file on windows to identify the problem that caused the crash:
1 – Press Windows Key + R or go to Start > All Apps > Windows System to open Run command window.
2 – Type sysdm.cpl and hit enter.
3 – A System Properties window will open. Now, click on its Advanced tab.
4 – Under ‘Advanced’ tab in Startup and Recovery option click Settings button.
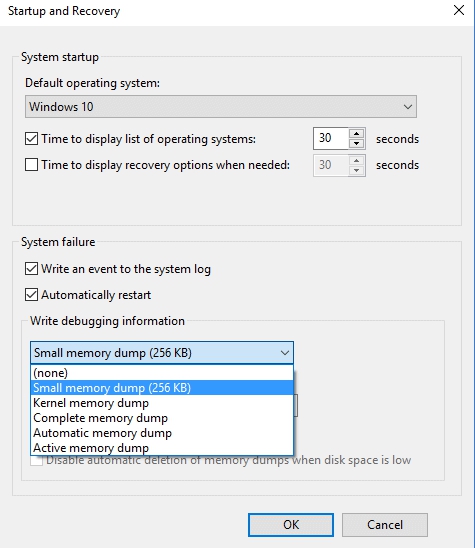
5 – In ‘Startup and recovery’ window under the option Write Debugging Information click drop-down menu and choose Small Memory Dump (256 KB).
6 – This will highlight a new box just under Small Memory Dump with title ‘Small Dump Directory’. This option should be set to %SystemRoot%\Minidump.
Now every time your Windows crashes all information will be saved in the small memory dump file you just created which you can use to find the reason behind the error. This small dump file is saved in C:\Windows\Minidump by default.
Read Small Memory Dump Files
Now that you have created memory dump file, its time to read one. There are various tools available to assist you in reading dump files on PC. Best among them are from Blue Screen of Death (STOP error) information in dump files from Nirsoft. OR, see Microsoft’s official page about how to read dump files.
That’s all guys. No more annoying blue screen errors now on Windows PCs after this solution.
Also See: How to Fix Netflix Error T1 on Windows (PC/Laptop) | How to Convert Windows Desktop into an iOS Interface on Windows 10


